I know the pain when you open a carton, cut a few samples, and discover defects that kill your schedule and your customer’s trust.
The top 10 rubber product defects usually come from trapped air, porosity, flash, short shots, surface burns, contamination, dimensional drift, hardness variation, and poor compression set. Each defect has clear process and design fixes.

When I debug defects in my own factory, I do not guess. I classify the defect, link it to material, mold, or process, and then I lock in a simple, repeatable fix that my team can follow on every shift.
Which rubber defects come from trapped air and porosity?
Many people call everything a “bubble”, but bubbles, voids, and blisters often come from different reasons and need different solutions.
Trapped air, internal voids, and surface blisters usually come from poor venting, wrong preform design, moisture in the compound, and the wrong closing or curing profile in the press.
I still remember one urgent HVAC project where internal voids destroyed a full batch. We had to cut dozens of pieces, change the mold vents, and re-train operators. After that, voids almost disappeared from that part family.
Air-related defects and practical fixes
1️⃣ Air pockets1, internal voids, and blisters
Air-related defects are the first group I check:
- Internal voids2 in the center or last-fill areas
- Trapped air pockets near ribs or thick sections
- Blisters3 on the surface that rise after demolding
These are often linked. Air cannot escape, or gas forms inside the rubber during cure.
🛠️ Main root causes
I usually see four key causes:
- Weak venting4: vents are too shallow, dirty, or missing near last-fill zones.
- Bad preform design: preform is too big, too small, or wrong shape, so it blocks vents.
- Wrong closing profile: press closes too fast, air has no way out.
- Moisture and volatiles5: stored compound picks up water, or the recipe has too much low-boiling oil.
✅ Checklists and fixes I use
I like to put the main ideas into a simple table so the team can follow them on the shop floor:
| Defect type | Typical look | Main causes | Proven fixes I use |
|---|---|---|---|
| Internal voids | Cavity in center of cross-section | Poor venting, early skin cure | Add/clean vents, adjust cure time/temp |
| Trapped air pockets | Round bubble near last-fill zones | Wrong preform, fast closing | Redesign preform, add “breathe” closing step |
| Surface blisters | Bumps that rise after demolding | Moisture, dirty mold, volatiles | Dry compound, clean mold, adjust post-cure |
In my own factory, I always start with clean vents and a correct preform. Then I tune the closing speed and add a short “breathe” step to let air escape. If bubbles still appear, I check compound storage and moisture. This simple routine has saved many projects from late-stage surprises.
Why do I see flash, short shots, and deformed edges on rubber parts?
Some buyers accept heavy flash or small short shots as “normal” and rely on manual trimming. I see this as hidden cost and hidden risk.
Flash, short shots, and deformed edges mostly come from mold mismatch, wrong clamp force, poor cavity balance, and badly controlled preform or injection parameters. These issues are preventable with good tooling and stable setup.

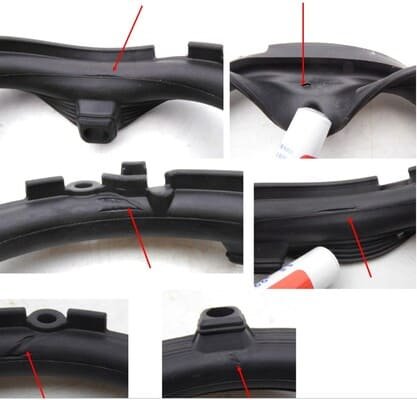
When I walk through the workshop, I can often tell from a single part whether the problem sits in the mold, the press, or the way we load preforms. I always take a sample to the office and mark it with a pen, so my engineers see what I saw.
Geometry and fill-related defects
2️⃣ Flash, overflow, and burrs
Flash6 appears where rubber forces its way out of the cavity:
- Long, thin fins along the parting line
- Thick overflow around holes or inserts
- Inconsistent flash between cavities
These not only look bad but also hide dimensional errors after trimming.
3️⃣ Short shots and incomplete filling
Short shots7 are the opposite:
- Corners not fully filled
- Thin edges missing material
- Logos or details not completely formed
They usually show that the cavity did not get enough pressure, volume, or flow.
4️⃣ Deformed edges and warpage
Sometimes parts look full but edges curve or warp after demolding. This often means uneven cooling, wrong demolding force, or internal stress.
🧩 Root causes and fixes in one view
| Defect | Main technical cause | Practical fix I apply |
|---|---|---|
| Flash6 | Low clamp tonnage, worn parting line | Increase clamp, refurbish mold, improve fit |
| Local overflow | Too much preform or wrong injection volume | Adjust preform weight or shot size |
| Short shot | Low pressure, cold runner, air blockage | Raise pressure, preheat, improve venting |
| Deformed edges8 | Uneven cure or cooling, rough ejection | Balance temperature, refine ejection design |
In compression and transfer molding, I first weigh preforms from each shift. When weight drifts, flash and short shots appear together. In injection molding, I watch fill time and cavity balance. I sometimes use transparent trial tools early in a project to see flow behavior. This small investment can remove years of chronic flash or short-shot issues later.
When edges still deform after these steps, I check demolding: ejector pins, stripping plates, and any manual force. A simple change, like adding a stripper plate or adjusting ejector speed, can stop many deformation defects.
What causes surface burns, flow marks, and contamination on rubber parts?
Nothing feels worse than seeing a beautiful part design ruined by scorch marks, streaks, and dirt that should never have reached the mold.
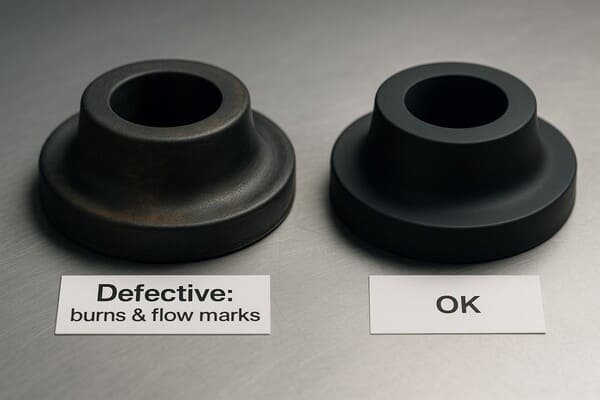
Surface burns, flow marks, and contamination usually come from overheated material, poor flow paths, dirty molds, or bad handling between mixing and molding. Clean process flow and honest temperatures fix most of these defects.

"surface burns and contamination on rubber parts")
I once walked into a workshop where operators used oily rags to wipe cavities “clean”. This single habit created a full set of mysterious stains and weak spots. We changed the cleaning routine and most of the “mystery” disappeared in one week.
Surface appearance and cleanliness defects
5️⃣ Burns, scorches, and over-cure marks
Burns show as:
- Dark or brown areas
- Brittle, cracked surfaces
- Strong smell near one region
They come from local overheating, too long cure, or trapped air that heats up and “cooks” the rubber from inside.
6️⃣ Flow lines and knit lines
Flow lines look like:
- Visible lines where two flow fronts meet
- Slight color or texture differences
- Weak spots at junctions
These often stem from poor gate location, low injection speed, or cold spots in the mold. When rubber meets itself at the wrong temperature, it leaves a scar.
7️⃣ Dirt, dust, and oil contamination
Contamination shows as:
- Black or colored specks in the surface
- Smeared stains or fingerprints
- Local adhesion problems
The cause is often simple: dirty compound film, dusty storage, oily hands, or dirty release agents.
🧼 My standard “surface health” checklist
| Defect group | What I check first | Typical fix I use |
|---|---|---|
| Burns / scorches | Mold temperature, cure time, venting | Lower temp, adjust cure, improve venting |
| Flow / knit lines | Gate design, injection speed, cold spots | Move gates, tune speed, balance temperatures |
| Contamination9 | Cleaning tools, handling, storage | Use proper cleaners, gloves, sealed packaging |
When I see burns, I never just cut cure time blindly. I check cavity corners, air traps, and hot spots. Sometimes a small vent or a slight temperature drop is safer than a big cure-time reduction. For contamination, I often reorganize the work area: closed boxes for compounds, lint-free cloths, and clear rules for mold cleaners. These look like small steps, but they change the whole look of the parts.
How do dimensional errors, hardness drift, and compression set become defects?
Many rubber defects do not shout at you. They hide in dimensions, hardness, and long-term sealing behavior until a leak or failure appears at the customer site.
Dimensional errors, hardness variation, and poor compression set come from loose tolerances, unstable compound, inconsistent process control, and missing long-term testing. You prevent them with standards, gauges, and simple data habits.

I learned this the hard way on a sealing project. Parts looked perfect. However, after months in service, seals lost force and started leaking. We had to build a compression set test into the approval routine, and we had to tighten our processing window.
Dimensions, hardness, and life performance
8️⃣ Out-of-tolerance dimensions
Dimensional drift shows up as:
- ID or OD out of drawing limits
- Groove widths off target
- Stack-up lengths that no longer match assembly
The root causes include wrong shrinkage factors, mold wear, and inconsistent deflashing or post-processing.
9️⃣ Hardness too soft or too hard
Hardness drift10 feels like:
- Parts that compress too easily or not enough
- Different feel between batches
- Gaskets that cannot reach target compression force
This often comes from raw material variation, poor mixing, or wrong cure.
🔟 High compression set and loss of sealing force
Compression set11 problems show later:
- Gaskets that do not spring back after long compression
- Permanent flattening in seals
- Leaks after some months even though dimensions looked fine at shipment
This relates to compound design, cure level, and service temperature.
📏 How I keep these in line
I rely on simple, structured control:
| Area | Control tool I use | Result on defects |
|---|---|---|
| Dimensions | SPC on key dimensions, regular mold checks | Early warning before parts go out of spec |
| Hardness | Shore A checks per batch and per cavity | Stable feel and predictable sealing force |
| Compression set | Lab tests at realistic temp and time | Fewer long-term failures in the field |
When we design a new part, I always ask the engineer: which dimensions really matter for sealing, and which can float? I set tighter internal controls on those critical dimensions. For hardness, I pick a realistic tolerance, then I work with our compounder and curing process to hit that target with minimal drift.
For compression set, I view the test as insurance. We run test buttons or rings in the lab at the real operating temperature. If the compression set is too high, we adjust formulation or cure before full production. This small step dramatically reduces the risk of silent field failures.
On your side, as a buyer or engineer, you can ask for these three basic things in every new project: dimension reports, hardness reports, and compression set data. When a supplier can provide these consistently, your risk drops a lot.
Conclusion
The top 10 rubber product defects all trace back to design, material, and process fundamentals; once you classify the defect and apply a clear checklist, you can replace firefighting with stable, predictable production.
-
Learn how air pockets can compromise the integrity of your rubber parts and how to avoid them. ↩
-
Understanding the causes of internal voids can help you prevent defects in your rubber products. ↩
-
Discover the root causes of blisters to improve the quality of your rubber manufacturing process. ↩
-
Explore how weak venting can lead to defects and how to optimize your venting strategy. ↩
-
Discover how moisture and volatiles can lead to defects and how to manage them. ↩
-
Understanding the causes of flash can help you improve the quality of your molded parts. ↩ ↩
-
Learn about the causes of short shots to enhance your molding process and product quality. ↩
-
Explore strategies to prevent deformed edges and improve the overall quality of your products. ↩
-
Discover how to identify and eliminate contamination sources to ensure high-quality rubber parts. ↩
-
Learn about the implications of hardness drift on the functionality of rubber products. ↩
-
Understanding compression set is crucial for ensuring long-term performance of rubber seals. ↩


