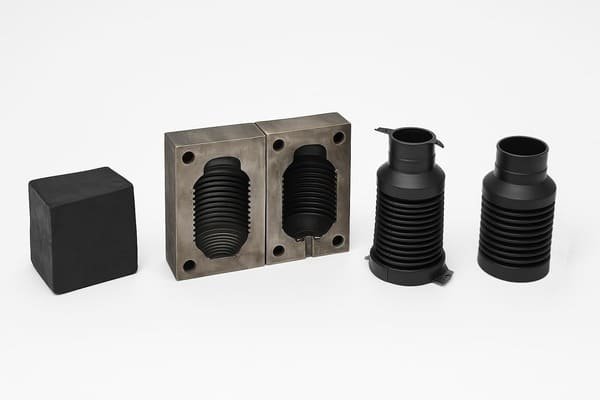
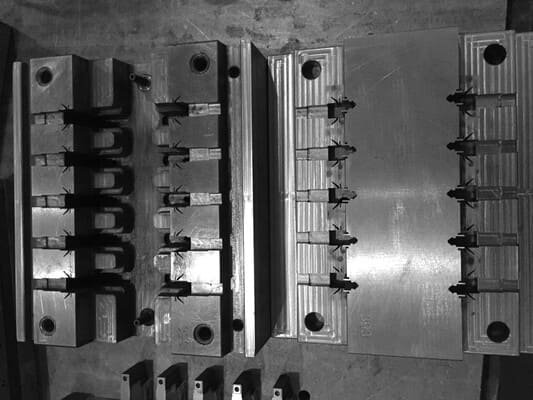
Struggling with long lead times, high risk, and costly changes? A sample mold reduces risk fast and proves the design with real rubber parts.
A sample mold is a lower-cost, faster-to-build tool used to make early trial parts in the correct rubber and hardness. It validates fit, function, process, and quality before I invest in a full production mold.

I use sample molds to turn drawings into touchable parts. Buyers see real samples. Engineers confirm dimensions and assembly. I confirm process windows and material choices.
Why do I need a sample mold before mass production?
Late changes hurt. Scrap hurts more. I use a sample mold to find problems early and protect the project.
A sample mold lets me test the design with real compound and real compression/transfer/injection conditions, so I catch dimensional drift, parting-line issues, and assembly risks before committing big money.
How a sample mold reduces risk
- ✅ Proves the drawing and tolerance class1 with real tooling conditions2
- ✅ Confirms hardness, compression set3, and aging behavior in the actual compound
- ✅ Exposes flashing, knit lines, trapped air, and demold issues
- ✅ Creates physical parts for leak tests, torque tests, and assembly pilots
Sample mold vs. production mold4
| Item | Sample Mold | Production Mold |
|---|---|---|
| Purpose | Validation, small runs | Mass production |
| Cost | Low–medium | Medium–high |
| Cavities5 | 1–4 typical | Multi-cavity (4–32+) |
| Steel | Often P20/NAK/soft tool inserts | H13/SKD61 or hardened |
| Change Flexibility | High (easy rework) | Low (changes cost time) |
| Target Output | Dozens–few thousands | Tens of thousands + |
What materials and structures are used for sample molds6?
Design choices matter. The mold steel7, cavity layout8, and venting9 decide part quality and speed.
Most sample molds use simpler frames, fewer cavities, and softer steels or pre-hardened inserts. Smart venting, balanced runners, and interchangeable cores make changes fast and data reliable.

Typical sample mold construction
- Base & Inserts: Pre-hardened tool steel (e.g., P20, NAK55) for quick machining and clean surfaces
- Cavities: 1–4 cavities to shorten build time and isolate variables
- Gating: Direct or short runner to stabilize fill and cure profiles
- Venting: Micro vents at flow ends to prevent air traps and burn marks
- Eject/Strip: Manual strip or simple eject features to keep cost down
- Spare Inserts10: Swap-in cores for rapid dimensional tweaks
Structure options by process
| Process | Structure Notes | When I Choose It |
|---|---|---|
| Compression | Flat plates, cavities with overflow/flash land | Thick sections, simple shapes, bellows |
| Transfer | Pot + sprues to cavities, better fill | Thin ribs, multi-cavity balance, moderate detail |
| Injection | Cold/warm runners, controlled fill | High precision, thin walls, future multi-cavity scale |
How long does a sample mold take and what does it cost?
Time kills deals. I plan fast tooling with clear scope and simple risk buffers.
A practical range is about 2–4 weeks for a typical sample mold, plus 2–5 days for first-article molding and reports. Cost depends on size, cavities, detail, surface finish, and process choice.
Lead time plan (typical)
| Phase | Tasks | Calendar Days |
|---|---|---|
| DFM & Tool Plan | Tolerance review, shrinkage strategy, split line, gates | 2–3 |
| CNC & EDM11 | Base + inserts machining, vents, runners | 7–12 |
| Assembly & Spotting | Fit, polish, flash land tune | 3–5 |
| Trial & Tuning | Cure window, fill balance, ventilations | 2–3 |
| FA Report | Dimensional, hardness, material certs | 1–2 |
Cost drivers you can control
- 📦 Cavities: start with 1–2; add more only if needed
- 🧰 Detail level: avoid cosmetic texturing till the design freezes
- 🌀 Process: compression is cheapest; injection costs more but scales better
- ✂️ Tolerance class: tighter classes raise machining time and polishing
- 🔁 Change margin: add spare inserts now to avoid a new tool later
How does a sample mold control tolerance and shrinkage?
Rubber shrinks. Molds must “add back” that shrinkage. Tolerances and cure conditions matter.
I compute shrinkage from compound data and past runs, then I tune flash land, vents, and cure time. I measure first articles against the drawing and ISO tolerance class, then I adjust inserts if needed.
Practical steps I follow
- Shrinkage preset: Start with compound’s historical rate (e.g., 1.2–2.5%)
- Flash land control: Thinner land reduces flash but risks short fill; I balance it
- Vents: I add vents at last-fill areas to avoid dimensional pull from trapped air
- Cure window: Under-cure grows dimensions; over-cure can pull them down
- Gauge plan: I use calibrated pins, CMM, and go/no-go gauges on CTQ dimensions
Tolerance & shrinkage reference table (quick view)
| Topic | What I Do | Why It Works |
|---|---|---|
| Shrinkage Compensation | Overbuild cavity by predicted % | Closes the gap to nominal after cure |
| Critical-to-Quality (CTQ) | Add datum scheme, selective polish | Holds key fits while letting non-CTQ float |
| Repeatability | Record press, temp, time, pressure | Links dimensional data to process settings |
| Insert Rework | Keep steel-safe on risky dims | Fast, low-cost corrections after FA |
What documents and tests come with sample-mold parts?
Decision makers need proof, not promises. I package the data with the samples.
I deliver a compact FA/PPAP-lite pack: material and hardness certs, dimensional report, curing parameters, and if needed, compression set, aging, and leak tests. You get reliable evidence to sign off.

Typical “PPAP-lite” bundle I provide
- 📑 Drawing DFM note with agreed tolerance class and test points
- 🧪 Material cert (polymer family, cure system, hardness target)
- ⚙️ Process sheet (press temp/pressure/time, post-cure if used)
- 📏 Dimensional report (CTQ + sample size, method, results)
- 🧰 Hardness test (ASTM D2240, dwell, temperature)
- 🔄 Optional tests: compression set, tensile, tear, aging, leak/pressure
Sample size and acceptance
| Part Type | Typical Qty for FA | Why |
|---|---|---|
| O-rings12, gaskets13 | 20–50 pcs | Covers dimensional spread14 and installs |
| Complex seals | 10–30 pcs | Verifies tricky ribs/lips and demold |
| Hoses/bellows | 5–20 pcs | Checks tooling vents and collapse risk |
When should I switch from a sample mold to a production mold?
The best time is not “ASAP.” The best time is after data is stable.
I move to a production mold when FA passes, assembly tests pass, and the process window is repeatable. Demand must justify more cavities, hardened steel, and automation.

Green-light checklist
- ✅ CTQ dimensions meet spec on multiple runs
- ✅ Assembly/leak/pressure tests pass with margin
- ✅ Cure window shows stable dimensions across the day
- ✅ Gate/vent/flash land layout is proven
- ✅ Real demand and forecast justify multi-cavity investment
Scale-up plan (simple view)
| Decision | Action | Result |
|---|---|---|
| Stable FA | Lock cavity geometry | Protects repeatability |
| Higher Demand | Add cavities or duplicate tools | Meets takt time |
| Quality Target ↑ | Upgrade steel, add cooling, improve venting | Longer life, lower scrap |
| Cost/Unit ↓ | Optimize runners, cycle time, automation | Better unit economics |
What size runs can I make with a sample mold?
Buyers often need bridge production15. I plan it with eyes open.
A well-built sample mold can support dozens to a few thousand parts, depending on material, cure time, and tool steel. It works as a bridge while the production mold is underway.
Bridge production guardrails
- ⏱️ Cycle time reality: Complex seals take longer; plan capacity early
- 🧽 Maintenance: Clean vents and flash lands often to keep dimensions stable
- 🧯 Risk stock: Build safety stock if the production tool ETA is tight
- 🔁 Change control: Freeze design once bridge production starts
How do I order a sample mold from Julong Rubber?
I keep the intake simple. Clear drawings, clear test plan, fast kickoff.
Send me your 2D drawing with tolerance class and key dimensions, plus a 3D STEP. Tell me the rubber type and hardness, and the tests you need. I reply with DFM, a quote, and a schedule.
My quick-start checklist
- 📐 2D + 3D: include split-line intent or let me propose it
- 🧫 Material: EPDM/NBR/HNBR/FKM/VMQ with Shore A target
- 📏 Tolerance: state your class for molded parts
- 🧪 Tests: compression set, leak, hardness, aging, others
- 📦 Quantity: FA quantity and any bridge-run needs
- 🚚 Incoterms & date: your target ship date and shipping terms
Work with me
- 📩 Email: info@rubberandseal.com
- 🌐 Web: www.rubberandseal.com
Conclusion
A sample mold is my safest path from drawing to good rubber parts. It validates the design, proves the process, and saves total cost.
-
Understanding tolerance classes can help you achieve better fit and function in your parts. ↩
-
Explore optimal tooling conditions to improve the efficiency and quality of your molds. ↩
-
Explore the significance of compression set tests in evaluating rubber performance. ↩
-
Understanding the differences can help you choose the right mold for your production needs. ↩
-
Understanding mold cavities is crucial for optimizing production efficiency and part quality in manufacturing. ↩
-
Explore how sample molds can streamline production and reduce costs in the manufacturing process. ↩
-
Learn about the various mold steels and their applications to optimize your tooling. ↩
-
Discover how effective cavity layout can enhance part quality and production efficiency. ↩
-
Proper venting is crucial for quality; find out how to implement it effectively. ↩
-
Explore this resource to understand how spare inserts enhance mold flexibility and reduce downtime, crucial for efficient production. ↩
-
Learn about CNC and EDM processes to enhance your mold-making capabilities. ↩
-
Explore this resource to gain insights on O-ring design, materials, and manufacturing techniques that ensure optimal performance. ↩
-
Explore this resource to understand the optimal materials and designs for gaskets, ensuring quality and performance in your projects. ↩
-
Understanding dimensional spread is key to ensuring quality and consistency in production. ↩
-
Discover how bridge production can serve as a temporary solution while waiting for full-scale production. ↩


